This tutorial will explain how to get the Oculus Rift consumer version working with Unity as of April 9, 2016.
At Bitcamp, we kicked off our new partnership with Oculus to distribute the brand new Rifts to student hackers around the world. You can read more about it on VentureBeat or MAKE. Since a lot of hackers out there will start getting their hands on these brand new devices in the coming weeks, this post will explain just how to set up your development environment in the proper way.
For this tutorial all you need is an Oculus-ready Alienware X51 PC running Windows 10 and an Oculus Rift consumer version. Make sure that you do not have any other versions of Unity 3D or Oculus installed before starting – if you do, uninstall them first.
Step 1
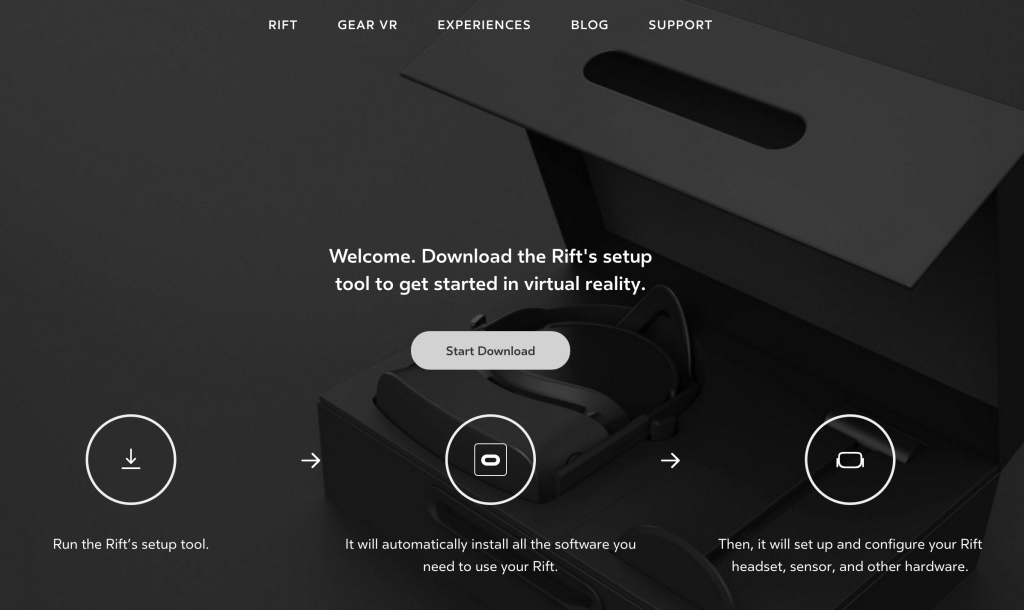
Start off by going to http://oculus.com/setup and hit Start Download. Unlike past versions of the SDK, this bundled download gives you the consumer tools and developer tools you need to work with Oculus. As of writing this post, we had version 1.3.0 of all of the Oculus tools. Once your download is done, start the install process by double clicking the exe.
Step 2
Once Oculus is finished installing, head over to Unity 3D and download the latest Unity beta version. We used 5.4.0B13. During the Unity install, make sure you check off the box that installs the Visual Studio add-on.

Step 3
Once Unity and Visual Studio are done installing, go to the Oculus Developer portal, hit Other Downloads, and grab OVRPlugin for Unity 5 v1.3.0 and Oculus Utilities for Unity 5 v1.3.0

Step 4
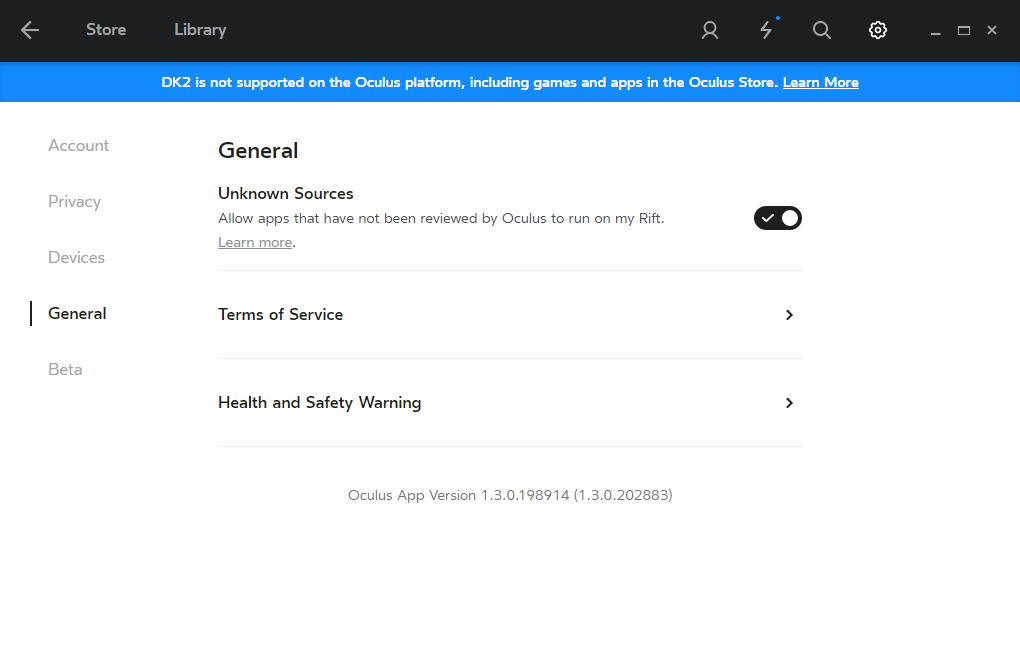
Open the Oculus app on your desktop, go to Settings, click the General tab, and turn on Unknown Sources.
Step 5
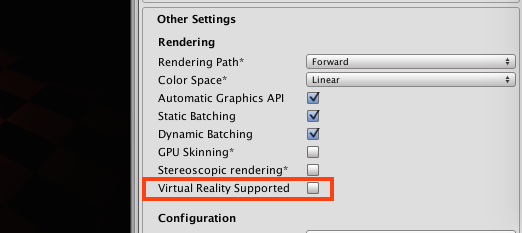
Now open Unity and create a new project. Make sure it is set to be in 3D. Once your project opens, go to the Edit menu, hit Project Settings, click Player, and then in the Player dialog go to Other Settings. Enable “Virtual Reality Supported” – you should now see Oculus right underneath that checkbox.
Step 6
Now go to Assets and Import Package. Import your recently unzipped Oculus Utilities package that we downloaded in step 3. Then close Unity.
Step 7
Unzip (Extract All) OVRPlugin and then unzip (Extract All) the oculus file inside of it. Copy the newly extracted ‘oculus’ folder. Go to C:/Program Files/Unity 5.4.0B13/Editor/Data/VR and paste the oculus folder in there.
Step 8
Re-open Unity. Drag the C:/Program Files/Unity 5.4.0B13/Editor/Data/VR/oculus/win64/OVRPlugin.dll file right into Unity and drop it under Assets where you already have Oculus Utilities installed. You should now see OVRPlugin alongside your other two assets folders. Then close Unity again.
Step 9
Go into the Oculus app, go to Settings, go to the Beta tab, and click Restart. Your Oculus app and device should now reboot.
Step 10
Re-open Unity, open one of the test Scenes that you got in the Oculus Utilities package, and hit play. Your Oculus Rift should now work as expected!