This post is syndicated from Freddie Lindsey’s Blog
Who?
This post is for people who have static websites they want to deploy and have running efficiently across multiple continents. It assumes only a limited knowledge of AWS, so most people are welcome.
You may have a site you’ve hosted with Squarespace, or be currently hosting your site using node.js on Amazon EC2 which will certainly cost you more than the solution I’m suggesting.
Do you want to cut your costs of hosting a site? Can you host it statically?
I’ll guide you through making a site that only costs you when people visit, not just for servers standing idle!
Why?
There are so many ways to host (static) websites. To name but a few: GitHub pages, Heroku, AWS EC2, AWS Elastic Beanstalk, Digital Ocean, and what I will be demonstrating below – AWS S3
However, best practices for publishing different types of site are not well published. If you are creating a dynamic site, you have an easy life picking where to start (normally based on cost). So, I thought I’d give a little insight into a way you can minimise the cost, maximise the performance, and maximise the security of a static website.
How?
There are four main parts to this post that I have explained below (skip to them using the links):
- Setting up buckets on S3 for your content
- Creating a CloudFront distribution for your content
- Routing your domain name using Route 53
- Securing your site using an SSL certificate
Setting up S3 for your content
To get started, we need to create a ‘bucket’ on Amazon S3 with the domain name you’d like to use (or any for that matter).
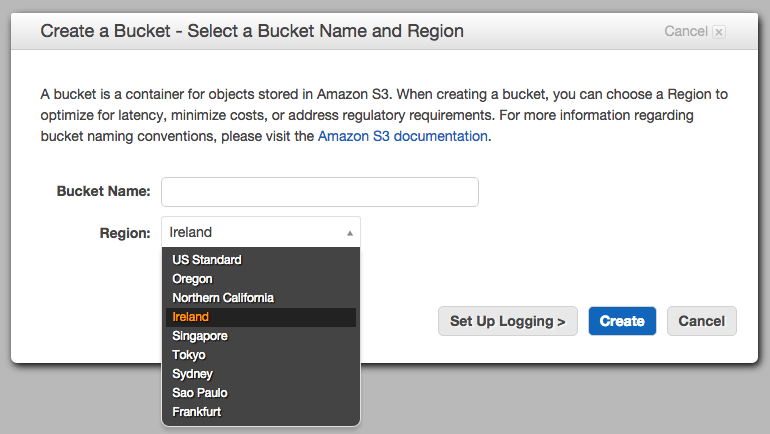
For our purposes the bucket will host all of our public content for the site, but if you want to use it for private content too, you can – just remember to put all your public content in one folder that you can refer to when we are setting up theCloudFront distribution.
Once you’ve created your bucket, you will need to modify some settings to get it ready for the web. Click on static hosting and set the options as below. If you want the root of your site to be anything other than index.html, you’ll need to change the settings below. However, note that the way we will be setting up AWS CloudFront ignores these settings.
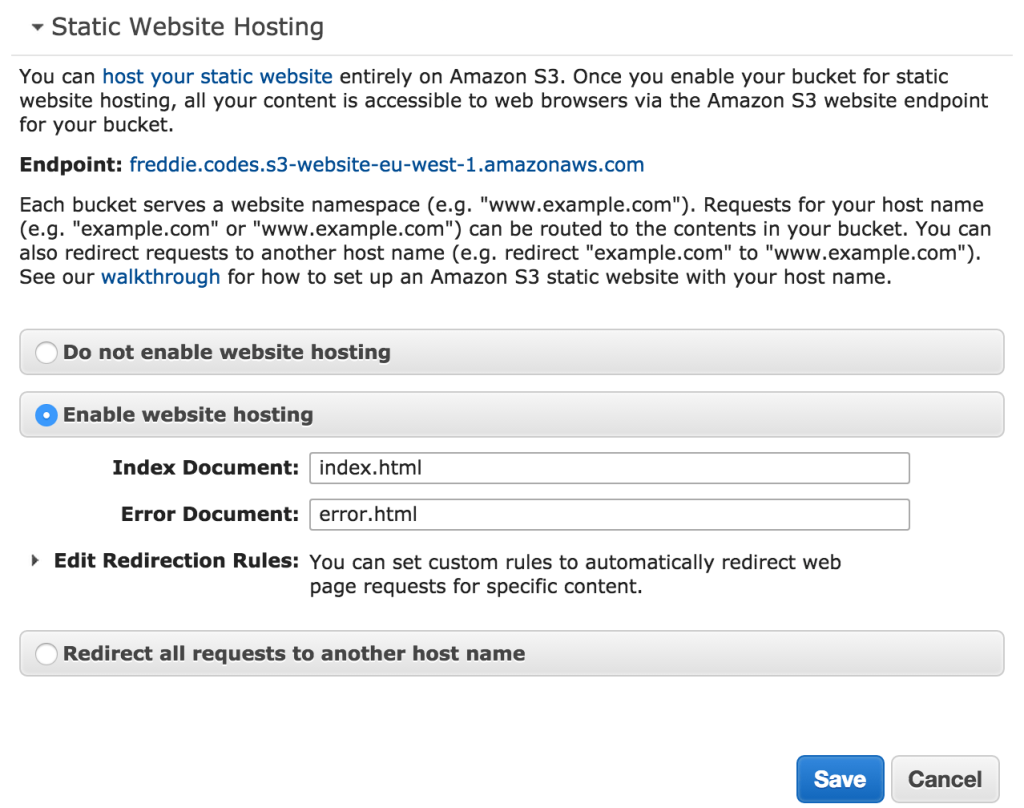
Some guides recommend changing the bucket policy at this point, but I’d suggest letting CloudFront do it’s job as we will see later. If we weren’t using CloudFront, we would need to edit the policy to make the files public.
We’re now ready to distribute our site.
Uploading your site to S3
Before you upload anything, I need to understand about IAM roles. In essence, these are what Amazon calls their user accounts. You will have a root account that will allow you to run anything under your own name and credit card. You can, and should, create separate IAM roles for different services you use to manage how they interact. For example, you might have an IAM role for the site you are creating which has access to S3, CloudFront, and Route 53. I won’t cover setting up your IAM roles, as I think Amazon do a brilliant job of getting you going here.
However, I recommend you upload your content to S3 either using the API, or as I do with a Ruby gem called s3_website. You will need both ruby and java installed to use this gem* which is easily installed below:
gem install s3_website
- If you haven’t got both Ruby and Java already installed, I will be posting in the near future about how best to install these.
** If you find you have to usesudoto install gems, you are installing them system-wide and this is not recommended. I will be posting shortly on how to install gems the ‘right way’.
Once you have installed s3_website, you need to configure the settings for it:
s3_website cfg create
This command will only generate the configuration file, you still need to fill it with your details! Open s3_website.ymlup in your favourite text editor (mine is Atom) and fill it out – ensure you turn gzip to true for best performance.
Note: you will want to fill out the CloudFront distribution ID later when we have set up our distribution – s3_websitewill invalidate old content automatically
I would recommend that you gitignore your configuration file, particularly if you are including your IAM role credentials!
Once you’re set,
s3_website push
And you’re site is live! Visit http://[yourbucket].s3-website-[region].amazonaws.com!
Distributing your site with CloudFront
Why would you want to distribute your site with CloudFront? I think that’s the first question.
Using S3 to serve your site, using Route 53 for DNS, and securing your site are all obvious.
CloudFront, or any CDN, can bring a lot of positives for your site:
- Faster requests with lower latency
- Block access to your origin content
- Simple redirection
- …
I think the main reason to use one though, is that without increasing your origin infrastructure, you massively increase the reach of your site, and with AWS, you make securing the site very easy.
So let’s create a distribution. You’ll want a web distribution when you’ve clicked the below button.

There are two parts of the options page that we will focus on – the origin, and the distribution settings.
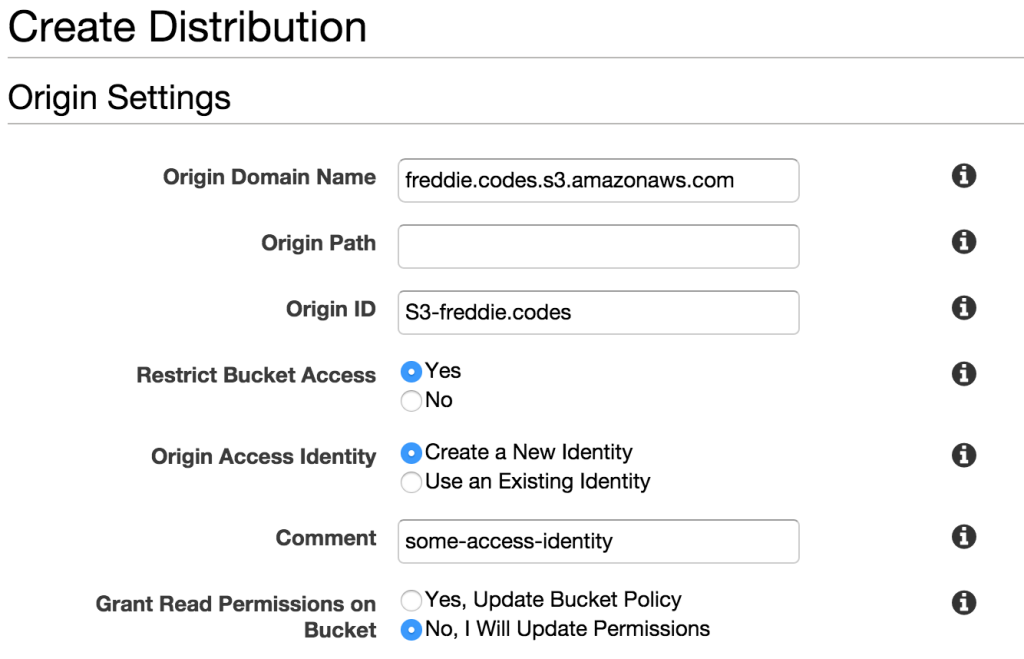
The origin domain name is the origin you want to distribute. For us, that is a bucket on S3. Clicking on the domain name box will reveal multiple origins, so just pick the one that you created earlier.
The origin path is the path which you want the root of your site to point to. For most people, this should be left blank.
The origin ID is a reference to the distribution. Pick something fun! I dare you!
If you want to restrict bucket access (and I suggest you do), you will need to either create an origin access identity or use an existing one. You will give it a name in the Comment field. The first time you associate an origin access identity with a distribution, I’d recommend you select to update the bucket policy. I have selected No for this field. Ensure you change it to yes!

The next thing I would recommend you change is the viewer policy. Scrolling down from the origin settings, you will see the above field. Changing it to Redirect HTTP to HTTPSkeeps your site secure for your users and, rightly or wrongly, gives you a bit more credibility. In the age of free WiFi, respect your user!
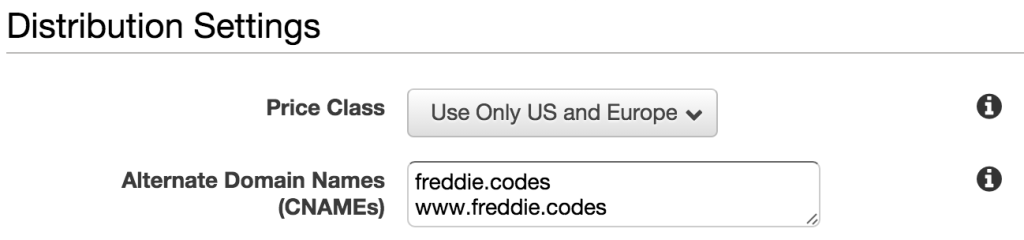
Finally, you’ll want to select the price class you want to pay for – I’ll leave that up to you, and you’ll definitely want to put in the CNAMEs you want to use into the field as shown.
You may want to redirect your users from the www subdomain to the APEX domain, and as such not include it here. But if you aren’t sure how to redirect them using Amazon, I’d suggest you do the same as I have.
Routing CloudFront to your domain
This is actually the simplest part of the whole process. You’ll want to skip this part if you bought your domain and manage it from somewhere other than AWS.
Amazon make integrating their various services so easy, it’s a big positive of using them throughout your application architecture.

If you haven’t already registered the domain you want, I can’t recommend AWS enough! Get buying!
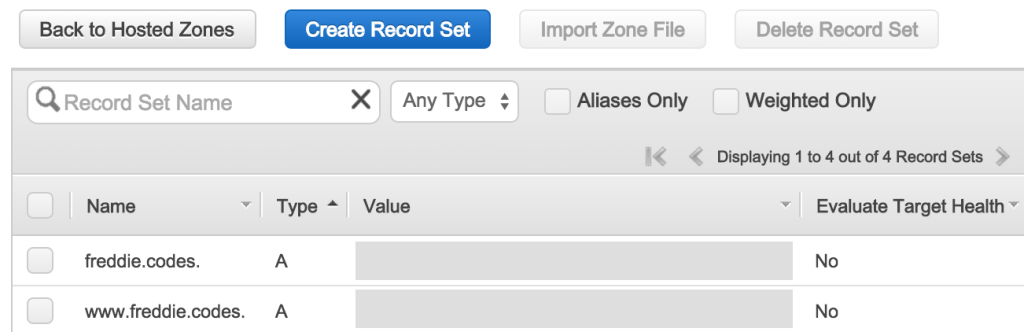
Click on the domain name you want to use for your website once you’re ready. It’ll bring up a dashboard where you should click “Manage DNS”. You’ll see another list of all your domains, where you should click on the one you’re using again to manage the record sets.
Hopefully, you should find you have a page like this (without A records):
You will want to create a new record set. Leave the name blank, select A - IPv4 Address as the type, and select yes to alias. When you click on target, if you’ve set up the CloudFront distribution as above, you should find it appears in the relevant place. Select it and save the record.
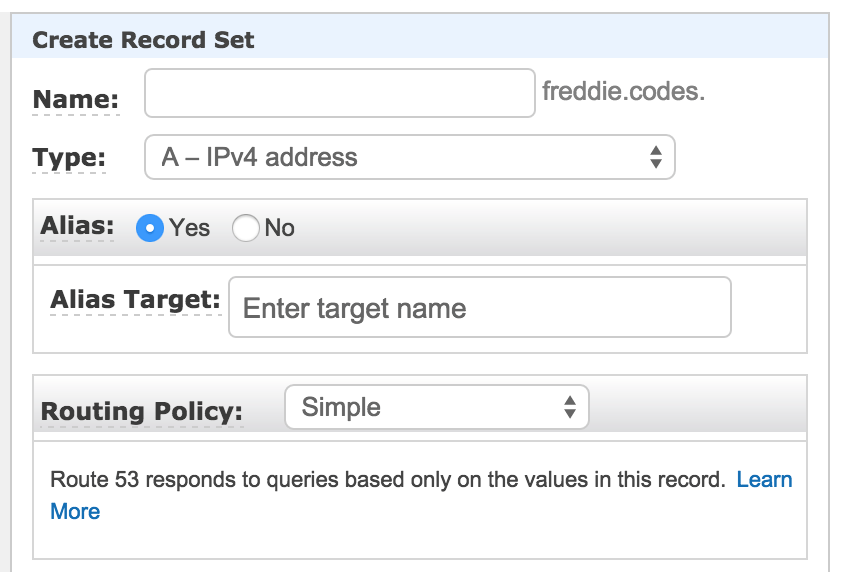
This will now be routing your APEX domain (freddie.codes for me), to your CloudFront distribution and is ready.
If you want to route your www subdomain (highly recommended), add another record set with the name as www, type as A - IPv4 Address, and select yes to alias once again. Now when you click on target, you should see and select the www.{YOUR_DOMAIN} CloudFront distribution.
That’s it! All set up! Apart from… the site isn’t running on HTTPS just yet, and that would be nice.
Custom SSL Certificates for AWS CloudFront
Creating your SSL certificate for CloudFront is very easy, provided you follow the instructions carefully – key security doesn’t have much margin for error! Amazon does have a guide, but it doesn’t cover every single little step.
There are three parts to this:
- Creating a certificate using a certificate signing request
- Uploading the certificate to Amazon with it’s own IAM role
- Associating a certificate with your CloudFront distribution
Creating a certificate: openssl
If you’re on a Mac, you’re already ready for this step. If you’re on a Linux ‘box, you may have to install it. If you’re on Windows, I reserve the right to not make any already assumed comments.
We will need a folder in our application where we will store all the ssl-specific files. If you don’t already have a folder you want to use, make a folder at the root of your project, and then cd into it:
mkdir -p ssl
cd ssl
Once you’re setup, the first thing we need to do is to create a key:
openssl genrsa 2048 > private-key.pem
Running the command above creates a 2048-bit private key file which we will later use with AWS.
Next, we need to create a certificate signing request. This will be what we upload to the authority who will, you guessed it, sign our certificate.
openssl req -new -key private-key.pem -out csr.pem
You will be asked all kinds of crazy information (which isn’t actually crazy at all). What the command spits out will look something like this:
You are about to be asked to enter information that will be incorporated
into your certificate request.
What you are about to enter is what is called a Distinguished Name or a DN.
There are quite a few fields but you can leave some blank.
For some fields there will be a default value.
If you enter '.', the field will be left blank.
When you complete this, remember that the ‘Common Name’ field is the full host and domain of your site. For this site, since it’s hosted at https://freddie.codes, freddie.codesis the common name. Remember what you type here as we’ll be using it a little later on!
Having completed this step, you’ll be glad to know we are ready to submit our certificate.
Submitting a CSR
To copy your certificate on a Mac, you can run the following command and the CSR will be on your clipboard. If you’re on Linux, you’ll have to change the pbcopy command for the relevant command.
cat csr.pem | pbcopy
Visit your certificate providers site and register your certificate.
If you’re using GoDaddy (as I am – and I got my certificate for only £4/year), it’s a really simple process. When I copied my Certificate Signing Request into the site, it verified that the site I was certifying is indeed freddie.codes.
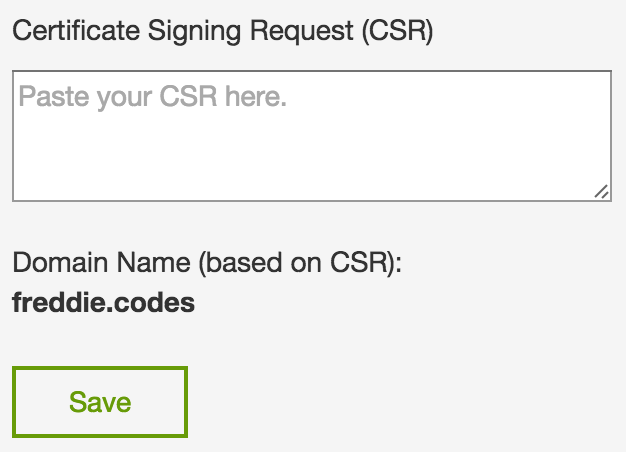
I’ve obviously removed my CSR from the above image, in case you were wondering!
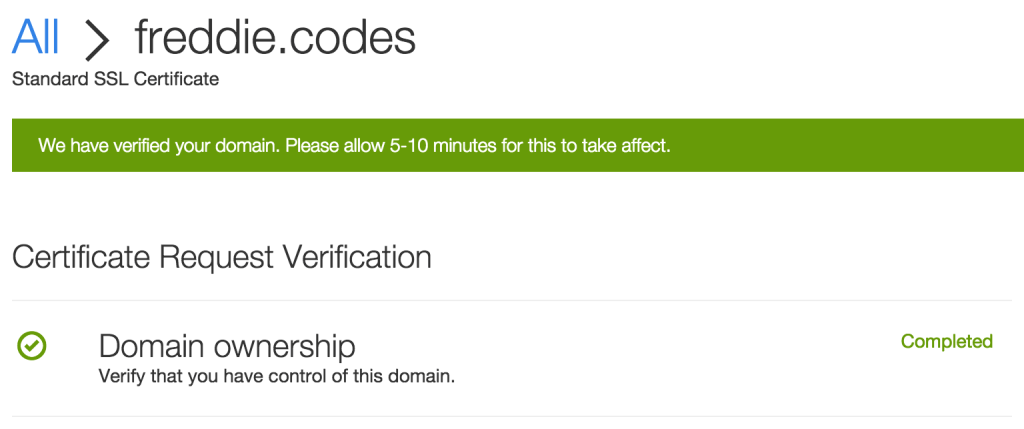
Once you’ve done this and submitted your request you may be asked to verify your domain. After this, you’ll probably receive something like below whilst the certificate is generated.
The next step is a bit more ambiguous and is where I have had some deliberation as to what to do. Again, if you’re on GoDaddy, you’ll want to go straight to downloading your certificate, and you’ll be faced with the following screen:

I tend to download the Apache version, although it might work with other versions.
When you open the zip file, you’ll be presented with two files something like below:
zip-folder-name
  -> 10f24aefec0fa9f8.crt
  -> gd_bundle-g2-g1.crt
The file that starts with gd is the chain certificate and the other (more random) file is the root certificate. You can rename these as below and move them into the ssl folder we created earlier:
10f24aefec0fa9f8.crt  ->  root_certificate.crt
gd_bundle-g2-g1.crt   ->  chain_certificate.crt
We’re now ready to talk to AWS and secure our distribution.
Uploading the IAM certificate to AWS
At this point you should have a folder called ssl or something similar and with the following files:
- private-key.pem
- csr.pem
- root_certificate.crt
- chain_certificate.crt
If you don’t, ensure you’ve moved the files into this folder and given them the names above, ready for the next steps.
To upload to AWS, you must have the aws command line installed. If you’re on a Mac, you can run brew install awscli to install it. If you’re on Linux, follow the instructionshere
Uploading the certificate is as simple as the following command.
NB: you must be in the ssl directory that we created ealier. If you receive errors, check this!
aws iam upload-server-certificate \
  --server-certificate-name [COMMON-NAME] \
  --certificate-body file://$(pwd)/root_certificate.crt \
  --private-key file://$(pwd)/private-key.pem \
  --certificate-chain file://$(pwd)/chain_certificate.crt \
  --path /cloudfront/
You will need to replace [COMMON-NAME] with whatever you want your certificate to be called – I recommend the full host and domain we used earlier for the CSR (freddie.codes in my case).
You should receive a message back containing information about your certificate:
{
  "ServerCertificateMetadata": {
      "ServerCertificateId": "xxxxxxxxxxxxxxxxxxx",
      "ServerCertificateName": "freddie.codes",
      "Expiration": "2016-08-30T15:24:43Z",
      "Path": "/cloudfront/",
      "Arn": "arn:aws:iam::xxxxxxxxxxxx:server-certificate/cloudfront/freddie.codes",
      "UploadDate": "2015-09-06T21:02:01Z"
  }
}
Having uploaded your certificate, you can attach it to your CloudFront distribution. Simply go to the distribution and click on edit. You will be presented a page where somewhere near the top you will find you can select the custom SSL certificate you just uploaded.

Upon clicking save, you will find you have secured your site and should now find your site is secure when you visit the URL.

Summary
Congratulations! You should now have a domain secured with SSL, managed by AWS Route 53, pointing to an AWS CloudFront distribution, which is caching an AWS S3 bucket hosting your static content.