While most of you may already be aware of what MongoDB is and does, today we’ll be using MongoDB Atlas, a developer data platform that gives you access to your MongoDB database on the cloud. In this tutorial, we will show you how easy it is to sign up for a free MongoDB Atlas account, create your first MongoDB Atlas database, then read and write to that database using JavaScript!
Setting Up Your Account
First thing first, let’s get you a brand new MongoDB Atlas account. The great thing about MongoDB Atlas is that you can start using the service for free with no credit card required!
If you’re currently a student, you can sign-up using the GitHub Student Developer Pack and receive $50 worth of free Atlas credits AND a free MongoDB certification valued at $150. Head over to MongoDB’s student landing page to get started.
 If you’re not a student or don’t have access to the GitHub Student Developer Pack, you can set up a new MongoDB Atlas account through the general signup landing page. From here, you’ll have the opportunity to spin up a new database on MongoDB’s forever free tier.
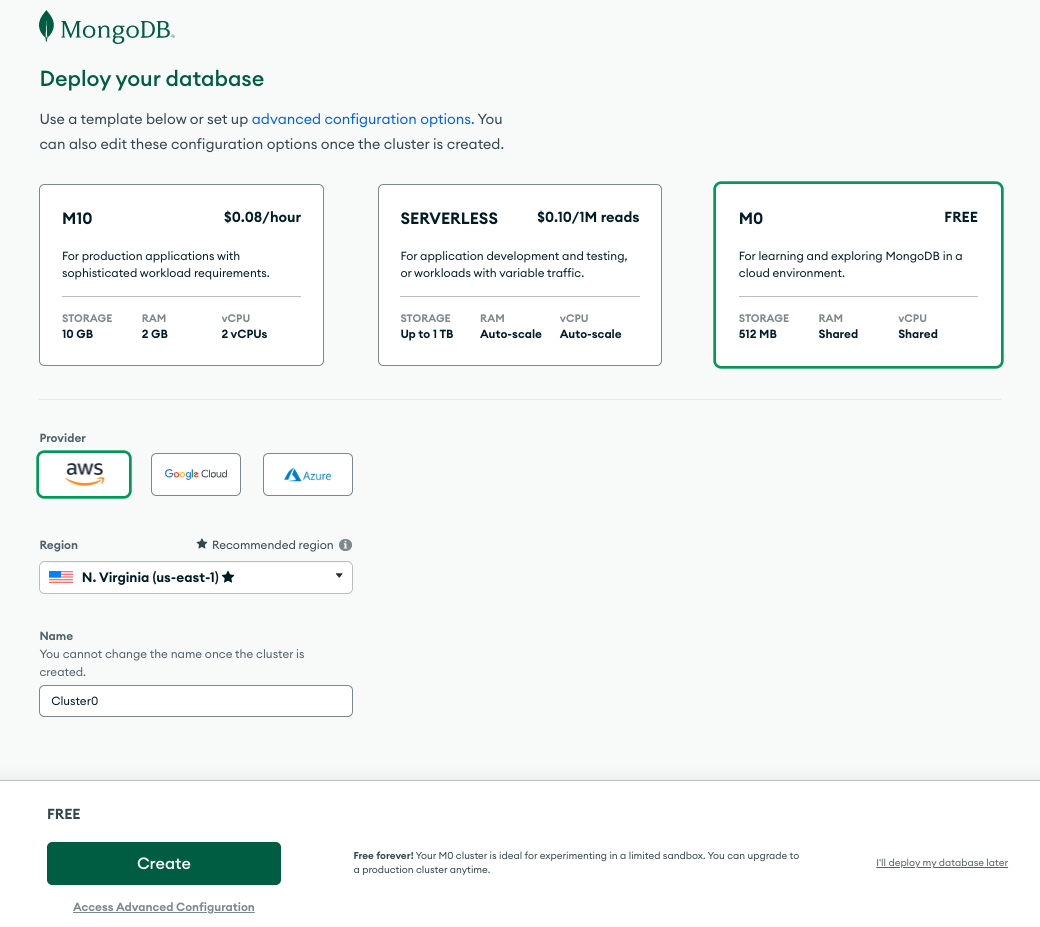
During your account setup, you will be prompted to deploy your first database.
Choose the free database instance, your cloud provider, and the region most appropriate for you as well as the name of your cluster. I’m going to use the default settings for the purpose of this demo and I suggest you do so as well.
A cluster refers to the way MongoDB data is both stored and hosted. In a traditional database, data is stored vertically in one location; picture an Excel spreadsheet with thousands of rows containing all of your data. In order to identify the correct cell, one would need to search through thousands of records before finding exactly what they’re looking for.
Conversely, in a clustered database, data is stored horizontally in multiple locations; picture several Excel spreadsheets side by side, each containing specific data, with only hundreds of rows. To find the correct cell, you go to the appropriate sheet containing the specific data you are looking for and search through only hundreds of records.
For many use cases, clustered databases can be more performant and easier to access.
Setting up your Database
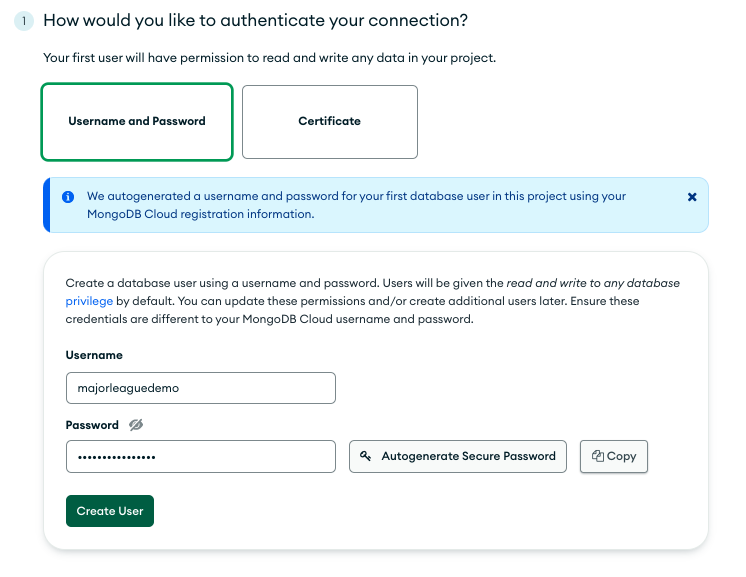
In order to access your database using a MongoDB driver, we’ll need to set up some permissions. For this demo, we’re going to create a username and password that will have administrative access to our database instance.
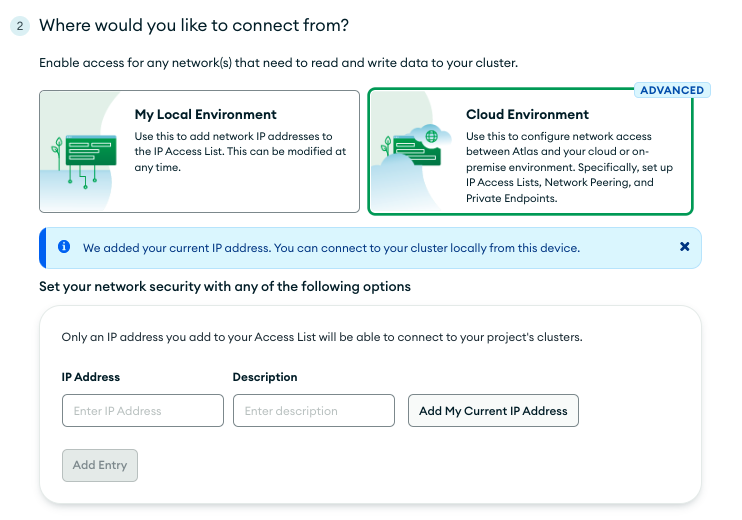
Now that we have a user, we’ll need to allow connection access to our database. Choose the ‘Cloud Environment’ option and add your current IP address.
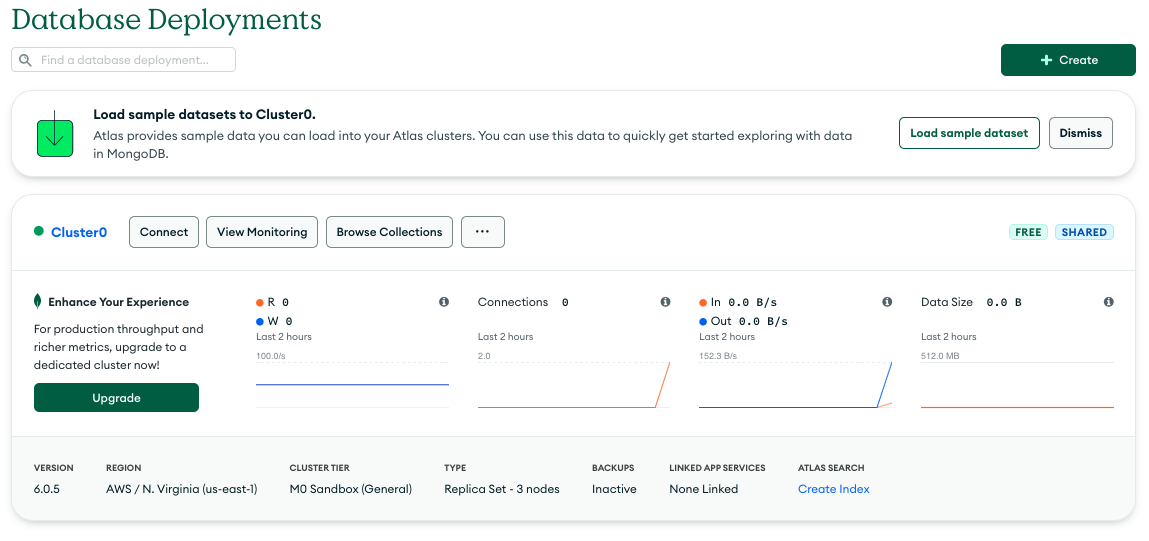
Finally, let’s head over to our database deployments. You should see the one we created during account signup. For now, let’s dismiss the sample dataset prompt and instead, hit the browse collections button. (note: for the purposes of this demo, we’ll be manually adding a single entry into our sample database in order to save time).
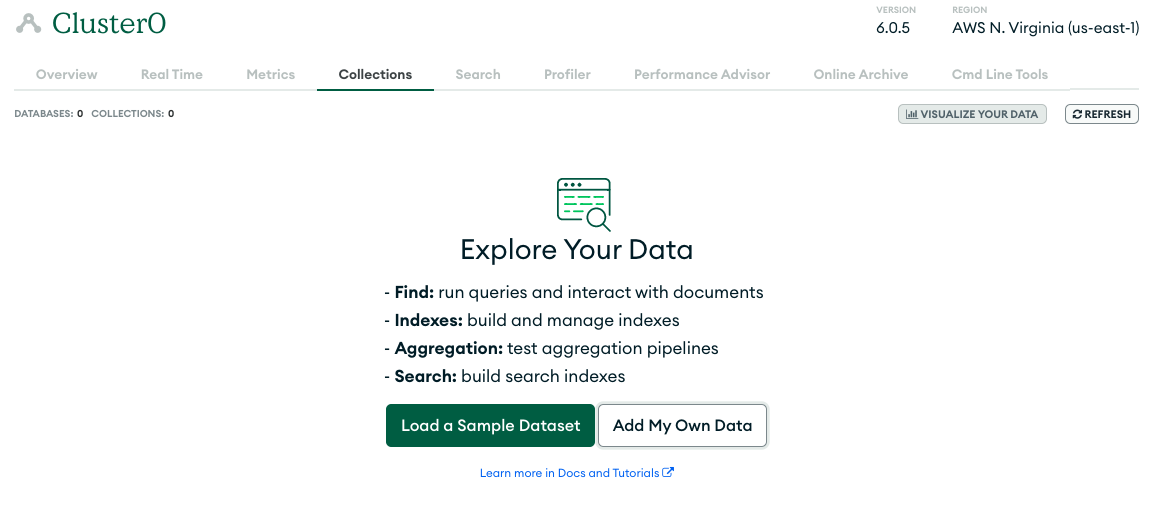
You’ll be taken to an empty ‘Collections’ page. From there, we can hit the ‘Add My Own Data’ button.
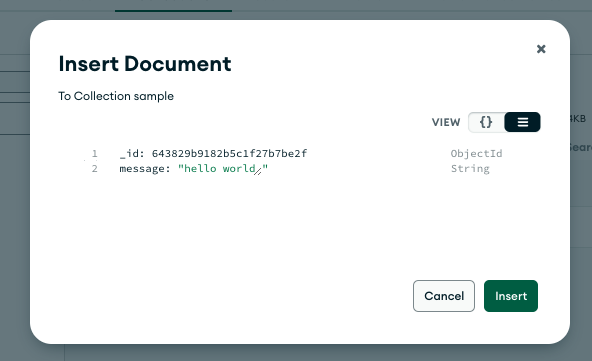
Aftering naming your database & collection (I chose ‘majorleaguedemo’ and ‘sample’ respectively), you’ll see your database displayed on the screen. From here, we’re going to insert a document. If you’ve never used a MongoDB database before, it will help to know that data is stored in JSON or BSON format and each document is automatically assigned an object id. As you can see below, I created a new key value pair using a string data type, message: “hello world”.
Your database and collection should now have a single entry! Congratulations on making your first MongoDB Atlas database. Now it’s time to learn how to leverage our database using JavaScript!
Connecting to your Database
Let’s jump into a terminal and set up a new project folder!
Run the following set of commands one by one:
cd ~/desktop
mkdir mongodb && cd mongodbnpm init -y
npm install mongodb@5.2
You should now have a folder on your desktop named mongodb, containing a package.json file and a node modules folder. Each will contain the necessary mongodb packages and dependencies to leverage your MongoDB Atlas database programmatically.
Now that we have our project set up, let’s head back to the MongoDB Atlas dashboard. Head over to your Database tab where you should see the cluster you made earlier displayed on the screen. Go ahead and hit the connect button.
From here, we’re going to select the “Connect to your Application” option -> select the Node.JS driver, version 4.1 or later -> and finally copy the URI connection string that is so conveniently provided by our friends at MongoDB.
mongodb+srv://<username>:<password>@cluster0.c80hlml.mongodb.net/?retryWrites=true&w=majority
As you can see, you’ll need to enter the username and password we created earlier during set-up in order for this connection string to work properly.
Please note: You should not deploy this URI connection string to a public repository! This will give the entire internet access to your database and potentially expose your account to fraud.
Running your First Query
Now that we have our connection string, let’s head back to our project folder. I’ve gone ahead and opened it up using VS Code, and I suggest you do the same. In the top level of our project folder, let’s create a new file and name it index.js.
We’re going to use this file to leverage our URI connection string and query the single document we currently have in our database collection.
Go ahead and add the following code to your index.js file.
const { MongoClient } = require(“mongodb”);
const uri = “mongodb+srv://<username>:<password>@cluster0.c80hlml.mongodb.net/?retryWrites=true&w=majority”;
const client = new MongoClient(uri);
const database = client.db(‘majorleaguedemo’);
const samples = database.collection(‘sample’);
Before we create a function that runs a query for us, just some things to note. First, you’ll see that we are leveraging our mongodb dependency by instantiating an object that stores its functionality { MongoClient }.
Next, we are creating a variable to store our connection string. The uri variable will allow us to create a direct connection with our Atlas cluster. Notice that we aren’t using express to spin up a server. Since we used MongoDB Atlas, our cluster is always available on the cloud, meaning we don’t have to host and serve the data ourselves!
Finally, we are creating variables that reference both our database name and our collection name. While the connection string gives us access to our entire cluster, there can be many databases and even more collections within a single cluster. This makes it necessary for us to programmatically specify the specific database and collection we want to access.
For the next step, we’re going to write some code that allows us to query majorleaguedemo.sample.
async function run() {
try {
// Query for a message: ‘hello world’
const query = { message: ‘hello world’};
const sample = await samples.findOne(query);
console.log(sample)
} finally {
// Ensures that the client will close when you finish/error
await client.close();
}
}
run().catch(console.dir);
Before we continue, I’ll just do a quick high-level explainer of that last function. We are using the async and await keywords in order to account for the timing of communications between our program and our database. This is similar to a fetch api call or use of the Axios library to create HTTP requests within your code. You may also recognize similar try and catch syntax that’s used to display an error message in the event of a failed request.
The first thing we do within our function is create a variable to store our query. As you can see, the query matches the single document that we have within our database collection.
Next, we create another variable that stores our search value. Here, we are taking our database collection variable ‘samples’ and using a mongoDB built in function ‘findOne’ in order to query a single document.
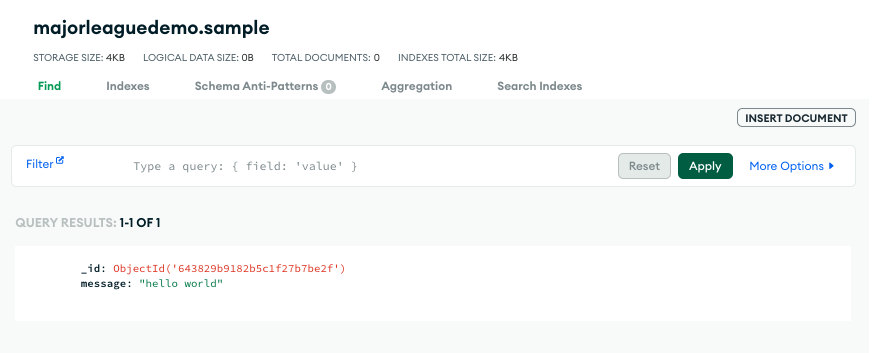
After running your program, you should see the following output: 
Congratulations! You’ve just made your first read from a MongoDB Atlas database!
Writing to your Database
So far we’ve set up a MongoDB Atlas account, we’ve created a database and a collection, and we’ve written a JavaScript program that reads data from our MongoDB cluster. Great work!
Next, we’re going to be writing new documents into our database collection using JavaScript! Luckily for us, we already have a lot of the work done for us.
Since we’ve already successfully connected to our database collection, we can go ahead and just write a new function! For now, let’s comment out our original run function and run() invocation in order to stop it from executing again.
Once you’ve got that completed, go ahead and add the following code to our index.js file.
async function write() {
try {
const write = { message: ‘how are you doing?’ };
const message = await samples.insertOne(write);
console.log(message);
} finally {
await client.close();
}
}
write().catch(console.dir);
You’ll notice that the main difference between our write function and our run function is our use of the built in syntax we’re using in our query. Before, we used findOne, and now we’re using insertOne.
Execute your code and your output should look similar to the following:

If you head back to your MongoDB Atlas dashboard, you should see a new document in your sample collection. Pretty awesome right!?
Now that we’ve learned how to write a single document into our database, let’s go ahead and write several documents into our database at the same time.
Just like we did before, let’s comment out the write function we wrote to prevent it from executing again.
Beneath our freshly //commented code, let’s add the following:
async function writeMany() {
try {
const write = [
{ message: ‘Im doing okay and you?’ },
{ message: ‘Im alright, thanks for asking’ },
{ message: ‘No problem at all!’ }
];
const messages = await samples.insertMany(write);
console.log(messages);
} finally {
await client.close();
}
}
writeMany().catch(console.dir);
Once again, the big difference here is the built-in syntax we’re using; insertMany versus insertOne. Another difference you might notice is that our write variable now stores an array of message objects, whereas before, it only stored a single message object.
Go ahead and execute your code. Your output should look like the following:
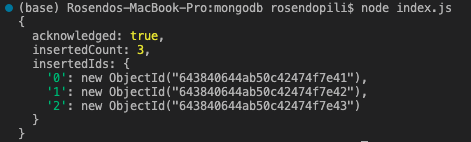
Once again, congratulations on creating your 2nd, 3rd, and 4th documents in your 1st MongoDB Atlas database!
Reading Multiple Documents from Your Database
Now, as an added bonus, I’m going to show you how to find multiple documents within your database collection that match specific criteria.
Go ahead and comment out the writeMany function we just made and add the following code at the bottom of your index.js file:
async function readMany() {
try {
// Query for a message that is not null
const query = { message: { $ne: null } };
const limit = { projection: { _id: 0, message: 1 } };
const sample = samples.find(query, limit);
await sample.forEach(console.dir);
} finally {
await client.close();
}
}
readMany().catch(console.dir);
Instead of the findOne syntax here, we are simply using find. We are also using a built-in key-value pair called projection to create some additional parameters for our search output. Our limit variable will make it so that each document we retrieve from our database collection displays a message without the object ID. This will make for a cleaner output.
{ $ne: null } is a special syntax used to denote !null or not null as a dynamic value in our search parameter. Notice that we are also using a forEach function on our console.log. Since we are returning an array of data, we’ll need to iterate over the response to apply our query and limit search parameters to each array index. Let’s go ahead and run the code!
Your expected output should look like this:

As you can see, we are pulling all documents with a message key that has a not null value or in other words, is not empty. If you want to try out some more of MongoDB’s built-in query syntax, check out their Quick Reference guide!
What’s Next?
Congratulations on making it this far! You’re now the proud owner of a MongoDB Atlas database and have the ability to read and write to that database using the power of JavaScript!
You should now have enough of an understanding of programmatic MongoDB queries to get you well on your way to building an awesome application. You’re also on the fast track to winning the Best Use of MongoDB Atlas prize category at your next MLH Hackathon, so be sure to submit!
Hungry for more? Check out the resources below to help you level up your knowledge of MongoDB Atlas!