On our four hour ride to William and Mary, amidst the numerous complaints about driving and lack of ideas, as well as the general bantering with one another, Quentin turned to Noah with a smirk. “Noah, think of an idea already.” As Noah proceeded to outline a brilliant plan, Quentin and I slowly began to smile giddily. I exclaimed, “Noah, you’re a genius!”
When we got there, initially all we saw were tribeHacks’ cramped tables. After our brief disenchantment, however, everything else we saw was wonderful. The sponsors had a good mix of self promotion, good advice, and general enthusiasm to make the opening ceremonies wonderful, the food we enjoyed right after was varied and delicious, and, above all, there was an abundance of Soylent. As we walked around, we realized helping hands were abundant, and people, fellow Hackers, sponsors, and mentors alike, were very friendly and willing to offer advice and help debug. While I am sure the lectures and events were all very informative and useful, Quentin, Noah, and I all decided against going, and instead just kept working on rideHacks. What is rideHacks, you might ask?
What is it?
Essentially, rideHacks is our attempt at a solution to give more people the opportunity to get to distant hackathons, through carpool organization and planning. The way it works is simple: you select your desired Hackathon, choose between whether you are willing to drive or looking for a ride, then enter your address. You will be placed on a map, alongside all the other people looking and offering to drive. You can hover over other’s pins, find people nearby, and email them to see if they would like to join you or give you a ride. Our vision is to give those who don’t have cars and can’t afford transportation an opportunity to go to hackathons.
How it was made
The front end of rideHacks was coded in HTML using w3 and bootstrap, while the backend was coded in plain old vanilla JavaScript. Firebase was used to store all the locations and user information. Thankfully, Firebase had a very easy to use built in log-in system, which allowed for quick implementation. Google maps, Google geolocation, and Google locations API were used for conversion between longitude/latitude and address, as well as the visual display of the map.
The first feature we made was placement of pins based on location. To do this, first we needed to add events. This was done by the following JS code:
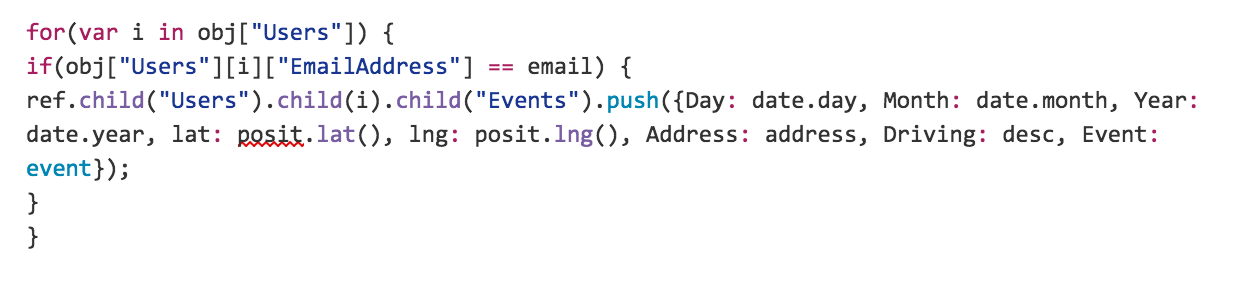
We searched through obj, which was a JSON that held the Firebase’s info, and then added the event to the list of users. What’s useful about firebase is the fact that it automatically generates random IDs for each respective user. However, the downside with this approach is that a database with too many layers requires a large number of nested for loops, which is both a hassle to write and inefficient for large databases. For us, however, all we needed was one or two loops, maximum, so this worked quite nicely.
The Experience
Noah did a very nice job taking care of the front end, while Quentin and I worked on the JavaScript. Quentin came in knowing nothing, but he picked it up very quickly and was a very effective teammate. All of the programming was fairly straightforward, as Firebase and Google Maps have reliable documentation. However, one problem arose with placing the pins on the map. For example, the code below is all it took to add a pin.

However, looks can be deceiving. Google maps does not keep track of any pins on the map, so a handle needs to be kept track of for each pin. Furthermore, we needed to be extra careful with declaring the markers, as the markers would overwrite themselves and fill our marker array with repeats. Thankfully, others before us encountered this problem, so once we realized what was happening, finding the workaround online was a breeze.
The Final Product

Enter a starting location in the search bar, click offering to drive, and click Add Event to join an event, putting it on your list and showing the route to take when driving.

Users cannot join an event multiple times, but they can join multiple events, deciding for each one whether they are offering to drive or looking for a ride.

Clicking an event on Your Events shows a map of the event, the other attendees, whether they are driving or looking for a ride, and the starting location you chose when joining the event.

Hovering over an event pin give you the address, name, and date. Hovering over an attendee pin gives you their name, email, and location.
The Future
We plan on continuing this project and seeing how far we can run (or drive!) with it. Our first step is to clear up our 750 line single html file, as we did not have enough time to make our code both functional and maintainable. Once that task has been completed, though, we’ll begin talking about what features to focus on first. We have a huge list of ideas, such as a built in chat system, monetary compensation, among other features, as well as how to make the design more intuitive to use. Regardless, we’ve got a long list to work on and are excited to get started.
Overall, tribeHacks was a great 36 hour adventure, and while the ride home was not a rideHacks carpool, we still had a lot of fun talking about all the shenanigans that had ensued.
Joe, Quentin, and Noah are all freshman at UMBC. This was their second Hackathon, with plans to attend many more in the future. If you’re interested in contacting them, email jberns1@umbc.edu, qhuyett1@umbc.edu, or noa3@umbc.edu.