Hello World! My name is Stef. You may know me as the girl with the paint from Bitcamp. I’m excited to announce my new monthly Art Hack series for MLH, featuring tutorials and stories chronicling my experience as an artist and hackathon n00b.
Full disclosure: I’m still pretty new to tech. I signed up for GitHub while writing this post. My hope for these tutorials is to share some of what I’ve learned about art, while learning more about tech from all of you.
For this entry, we’ll be creating a painting hack complete with programmable lighting.
The cool thing about this project is that it combines three different media: paint, electronics, and software. You will also explore additive and subtractive color. Both are more or less what they sound like: in subtractive color, you begin with white light and remove wavelengths to create new colors; in additive color, you begin with darkness and add light sources in varying wavelengths to create new colors.
My project is inspired by some Startup Shell friends who recently travelled to Iceland and got to experience the Aurora Borealis. Since I couldn’t go, I decided to create my own. The aurora makes for a great Art Hack, but you can follow this tutorial to create a painting of just about anything with fully programmable lighting.
Materials
| Shadow Box | 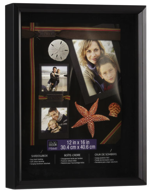 |
Shadow boxes have greater depth than regular picture frames, removing the need for a cardboard box. |
| Vellum Paper | 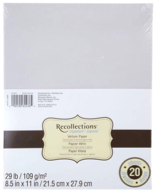 |
Vellum paper is slightly transparent, and is a cheaper option to diffuse LEDs rather than buying diffuser gels from a photography store. You can buy this by the sheet rather than a pack in the scrapbooking section of any craft store. |
| Acrylic Paint & Brushes |  |
I don’t usually have a preference when it comes to paint. It just needs to be opaque. I usually just look for something cheap. |
| Arduino Uno or Mega | 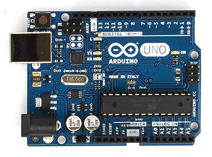 |
Arduino is a pretty user-friendly microprocessor. The LED matrix libraries ONLY work with these two microprocessors. |
| 5V 2A wall charger |  |
No more than 5V. |
| RGB LED Matrix |  |
There are larger options, but that’s a TON of LEDs. |
| Female/Male Barrel Jack Extension Cable |  |
This allows you to connect the wall charger to the LED board. Don’t get too attached. You will be cutting this up. |
| Wire | 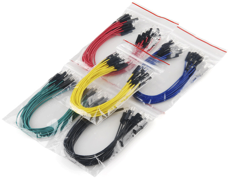 |
Either hook-up wire or jumper cables will work. |
Step 1: Painting
Decide what you want to paint, then figure out what you want to light. Once you’ve settled on these two basic elements, sketch the scene in pencil on the vellum paper. Tape the vellum paper behind the glass of the shadow box.
After you’ve differentiated the areas that will be be painted from the areas that will be lit, it’s time to paint! For my project, I’m painting a simple landscape, with the aurora as my lighting element.
Pro Tips:
- Acrylic paint slides right off smooth surfaces, so do a base layer, let it dry, then paint over it (see thumb twiddling and slinky scenes in video below).
- Don’t paint directly onto the vellum. The paper will absorb paint quickly and wrinkle.
- If you can see glass through the paint, light will shine through it.
- When mixing paint, black will dominate all other colors, so add it in small increments.
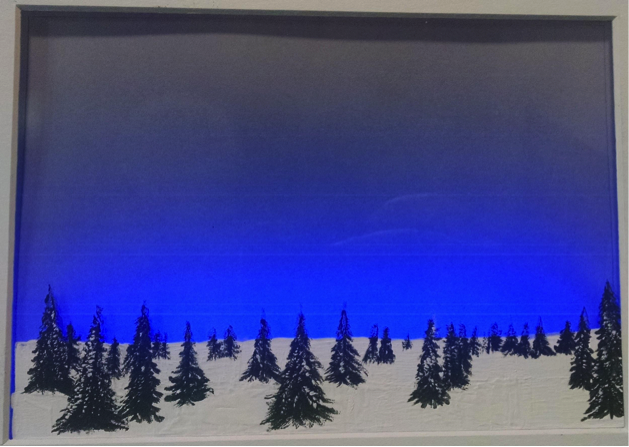
Here’s what my painting looked like before any lighting:
And here it is coming together:
At this point, your first medium is complete! Set your painting aside to dry and move on to wiring.
Step 2: Wiring
The Adafruit LED matrix that I’m using has specific wiring instructions that you can find here (thank you Phillip Burgess). The easiest thing to do is simply follow the guide and run one of the example codes provided.
These gorgeous diagrams do a great job of visually breaking down the wiring instructions:
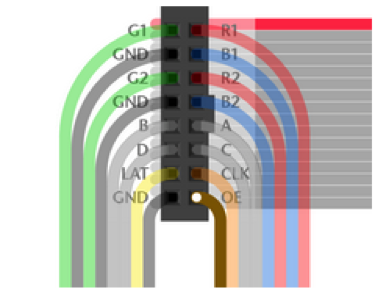
So simple, so clear…
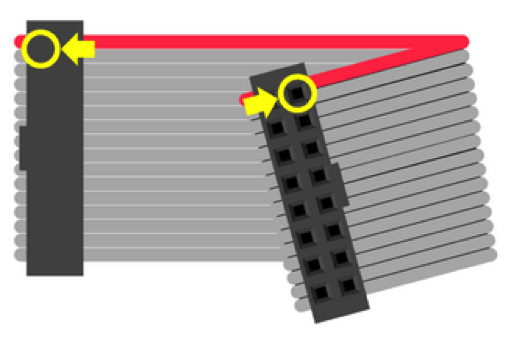
Pay very close attention to the power instructions on Adafruit. The LEDs can require a ton of current. When I was working on my original Art Hack at Bitcamp, my computer kept shutting down every time I tried to run the code. I had been using my computer to power both the Arduino and the LED board instead of wiring an external power source, which could have seriously damaged my laptop!
Pro tip: DO NOT use your computer to power both the LED board and the Arduino.
Second medium down! Wooo! Now that you are done wiring your board, it is time to move on to programming!
Step 3: Programming
Once your LEDs are wired up and you’ve powered on your devices, you can run one of the example code samples from Adafruit. You will need to download two libraries before running the samples: RGB Matrix Panel Library and Adafruit GFX.
The RGB Matrix Panel Library contains code specific to running the LED matrix so that you don’t have to worry about it when writing your code. The Adafruit GFX library is your graphics library. Both should be included in your programs.
Install the libraries in the libraries folder within your Arduino folder (here’s a helpful tutorial on installing Arduino libraries).
Testing Adafruit’s “Plasma” code with an obligatory Startup Shell plug.
After running one or two tests, you’re ready to begin programming! I recommend starting with one of the example programs and manipulating it to fit your design. Adafruit’s code samples use helper functions called, Color333 and Color444 to compact 3-bit and 4-bit numbers into single integers. These helper functions allow you to describe a color in terms of its primary components: red is Color333(7, 0, 0); green is Color333(0, 7, 0); and blue is Color333(0, 0, 7). Different combinations of these three elements will result in different colors.
Your computer’s memory stores information in combinations of 0s and 1s. Each 1 or 0 is a bit. When you hear the terms, 3-bit or 4-bit, this means that you computer is organizing information into 3 or 4 bit groups, respectively. For every bit, there are two possible outcomes (0 or 1). Therefore, for every 3 bits, there are 2^3 combinations of 0s and 1s in which information can be stored. In terms of 3-bit color systems, R, G, and B will each have 2^3 possible values that can be stored, and will yield 512 possible colors. For a 4-bit system, R, G, and B will have 2^4 possible values and can combine into 4096 colors. Limiting R, G, and B to ranges 0-7 or 0-15 was a bit confusing for me because the simplification loses the linear progression of colors.
For more precise control, you will want to utilize an 8-bit color system. This will result in 256 values for R, G, and B, defined within the range, 0-255.

Prime example of how RGB color codes can be used in everyday life. Also, prime example of a friendship that has gotten a little too close.
If you look at the RGB Matrix Panel Library, there is another helper function, Color888, which allows you to use the 0-255 range for your arguments. Using an 8-bit color system gives you 16,777,216 possible colors to choose from. I suggest using this website for RGB color codes.
The colors on the LED board won’t always appear exactly as they do on the website, so use them as a baseline and then experiment by changing the RGB values in your code. Fun fact: if you’re using a Mac, you can use the Digital Color Meter found in Utilities to pick color codes directly from images.
Pro tip: My programming mentor, Nick Aversano, taught me a great trick to help visualize the display. Using Photoshop, he pixelated images of auroras to match the resolution of the LED matrix. This allows you to map out which colors can be programmed by row, shape or pixel. You don’t have to do this, but I found it useful in planning the program.
The Adafruit GFX Library offers a ton of useful functions to create the general outline of an aurora. Here are some sample functions from the library:
| Shape | Function | Call |
|---|---|---|
| Line | drawLine | drawLine(int16_t x0, int16_t y0, int16_t x1, int16_t y1, uint16_t color) |
| Rectangle | drawRect | drawRect(int16_t x, int16_t y, int16_t w, int16_t h, uint16_t color) |
| Filled Rectangle | fillRect | fillRect(int16_t x, int16_t y, int16_t w, int16_t h, uint16_t color) |
| Circle | drawCircle | drawCircle(int16_t x0, int16_t y0, int16_t r, uint16_t color) |
| Filled Circle | fillCircle | fillCircle(int16_t x0, int16_t y0, int16_t r, uint16_t color) |
| Triangle | drawTriangle | drawTriangle(int16_t x0, int16_t y0, int16_t x1, int16_t y1,int16_t x2, int16_t y2, uint16_t color) |
| Filled Triangle | fillTriangle | fillTriangle(int16_t x0, int16_t y0, int16_t x1, int16_t y1,int16_t x2, int16_t y2, uint16_t color) |
| Round Rectangle | drawRoundRect | drawRoundRect(int16_t x0, int16_t y0, int16_t w, int16_t h,int16_t radius, uint16_t color) |
| Filled Round Rectangle | fillRoundRect | fillRoundRect(int16_t x0, int16_t y0, int16_t w, int16_t h,int16_t radius, uint16_t color) |
Every Arduino code must have a void setup and void loop to be compiled. Start with the setup loop. This will be the scene displayed on the screen when you turn on the painting hack. I am coding the gradient of the night sky row by row to keep it simple. This can easily be done with a series of lines at the bottom of the matrix.
 The aurora is going to consist of a few parts. I am creating the curves by moving simple geometric shapes across the board. Arduino works by looping through whatever code is contained within the ‘loop()’ function. Once it gets to the end of what you’ve written, it’ll start again from the beginning. To get your shape to move with every iteration (each iteration is called a frame), you can introduce a variable into the call of a geometric function and increment that variable before the program loops.
I am also adding streaks using vertical lines that will give the aurora that “dancing light” effect. Same idea: replace the y-coordinate of the drawPixel function with an incremental variable. First, call the function with a color, then call it again with R, G, and B values set to 0 so the line will fade away.
Finally, to loop the aurora so that it starts from the beginning, create a reset function that clears the screen and re-initializes the variables.
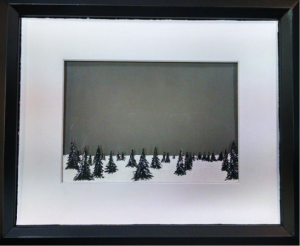
That’s it! You can find all of the code for the project on GitHub. Here are some screenshots of the final product:
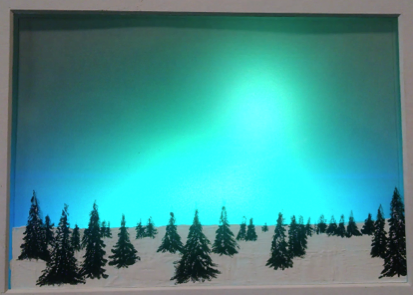 |
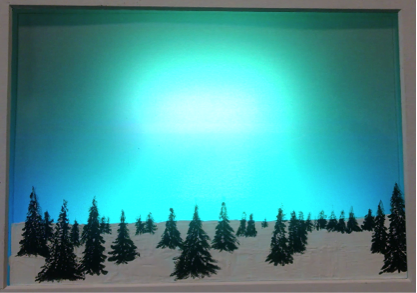 |
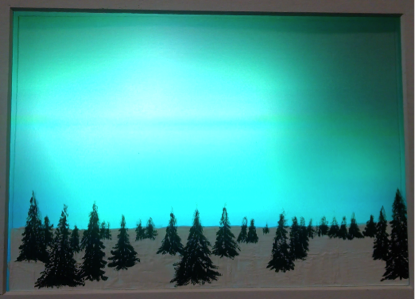 |
 |
I hope you found this tutorial helpful. If you have any suggestions for making the code more simple and efficient, please comment below.
By next month’s hacktorial, I’m hoping to be coding in Python, so stay tuned. In the meantime, I can’t wait to see the beautiful painting hacks you all create! Tweet your Art Hacks to @MLHacks with the hashtag #ArtHack (and maybe add a positive message like, “You can totally learn Python in a month, Stef!”).
Special thanks to Nick Aversano, for being so patient and helpful over Google Hangouts and Facebook messages and Jackson Geller for being a great teacher. Also, thanks to Chris Szeluga, for allowing me to post one of our embarrassing Facebook messages for all to see.